Expert Secrets: How Professional Painters Tackle Problem Walls, Peeling Paint, and Water Damage
Dealing with walls that have seen better days? Maybe there's peeling paint, or worse, signs of water damage. It can feel overwhelming, right? You might think a quick paint job will fix it, but that's usually not the case. How Professional Painters Handle Problem Walls, Peeling Paint, and Water Damage is a whole different ballgame than just slapping on some color. It's about knowing what's really going on behind the scenes and fixing it properly so it lasts. Let's look at how the pros tackle these common, but tricky, wall issues.
Key Takeaways
- Professional painters inspect walls thoroughly for hidden flaws like cracks, dents, or soft spots caused by moisture before starting any work.
- Addressing water damage is the first step; pros ensure walls are completely dry and sealed with specialized primers to prevent mold and stains before painting.
- Proper wall preparation, including scraping loose paint, sanding, and patching, is vital for the new paint to stick well and avoid future peeling.
- Pro painters use high-quality tools and paints, like angled brushes for detail and durable eggshell finishes, for a smooth, long-lasting result.
- For complex issues like extensive water damage or large peeling areas, trusting experienced professionals prevents costly rework and ensures a clean, even finish.
Addressing Water Damage Before Painting
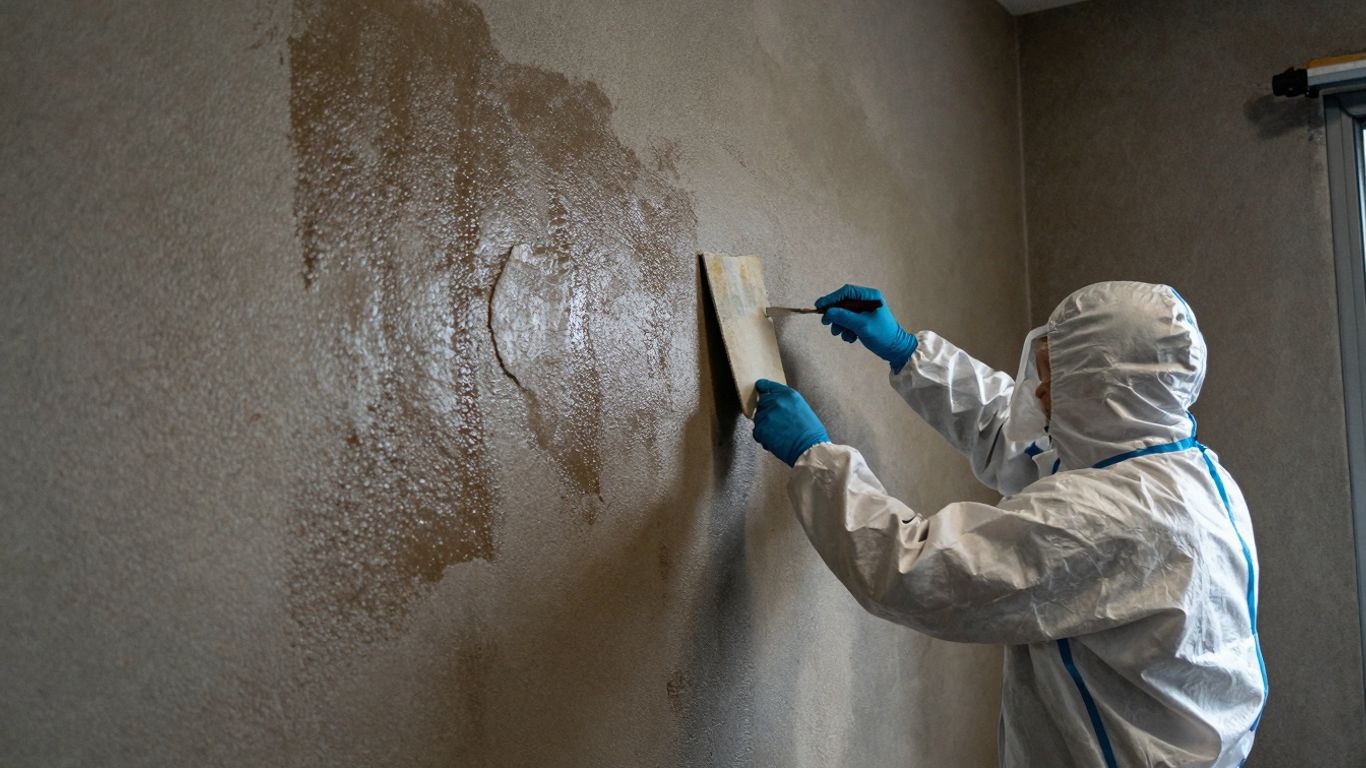
Water damage might seem like just a cosmetic issue at first, maybe a little discoloration or some bubbling paint. But honestly, it's way more than that. It's like a hidden enemy that can mess with your walls, and even the structure of your house, if you let it sit around. So, before we even think about slapping on a fresh coat of paint, we have to deal with whatever caused the water problem in the first place. Painting over damage is just a temporary fix, and it'll come back to bite you later, trust me.
Understanding The Hidden Costs Of Water Damage
It's easy to look at a water stain and think, 'Oh, I'll just paint over that.' But water doesn't just sit on the surface. It creeps. It gets behind drywall, under floorboards, and into all sorts of nooks and crannies you can't even see. This is where the real problems start. You get mold growing, the drywall can get soft and crumbly, and the paint just won't stick right. All of this means more work and more money down the line. It’s not just about the paint job; it’s about the health of your home.
Signs You Need Professional Water Damage Repair
So, how do you know if you've got a water issue that needs more than just a quick wipe-down? Keep an eye out for these things:
- Peeling or bubbling paint: This is a big one. If your paint is lifting off the wall, water is likely behind it.
- Discoloration: Yellow or brown stains on walls or ceilings are a dead giveaway that water has been there.
- Warping or cracking: Drywall that looks bent, cracked, or feels soft to the touch is a serious sign.
- Musty smells: That damp, moldy odor? It means moisture is present and probably growing something you don't want.
- Soft spots: If a section of your wall feels spongy or gives way when you press it, that's a clear indicator of water saturation.
Ignoring these signs is like playing with fire. The longer you wait, the more extensive and expensive the repairs will become. It's always better to catch it early.
The Importance Of Prompt Water Damage Remediation
When water damage happens, time is really of the essence. The longer moisture lingers, the more damage it causes. Think of it like this:
- Immediate Action: As soon as you notice a leak or water intrusion, stop the source if you can and start drying the area. The faster you dry, the less damage occurs.
- Assessment: Get a professional to look at it. They can figure out how far the water has spread and what needs to be done.
- Restoration: This involves drying out the affected materials completely and repairing or replacing any damaged parts, like drywall or insulation.
Only after all this is done, and the area is completely dry and stable, can we even think about painting. Trying to paint over damp or damaged surfaces is a recipe for disaster. It won't look good, and it won't last.
Expert Techniques For Problem Wall Preparation
Getting walls ready for paint isn't just about slapping on a coat. It's the real work that makes the final color look good and last. Professionals know that a smooth, solid base is everything. They don't just look for the obvious stuff; they're hunting for any little thing that could mess up the paint job later on.
Thorough Wall Inspection For Hidden Flaws
Before any sanding or patching starts, pros do a detailed check. They run their hands over the walls, looking for anything that feels off. This includes tiny cracks that might be hard to see, soft spots that could mean water damage, or areas where the drywall tape might be lifting. They're basically looking for the wall's weak points. It’s like a doctor giving a patient a check-up before a big event. They'll mark any issues they find so nothing gets missed.
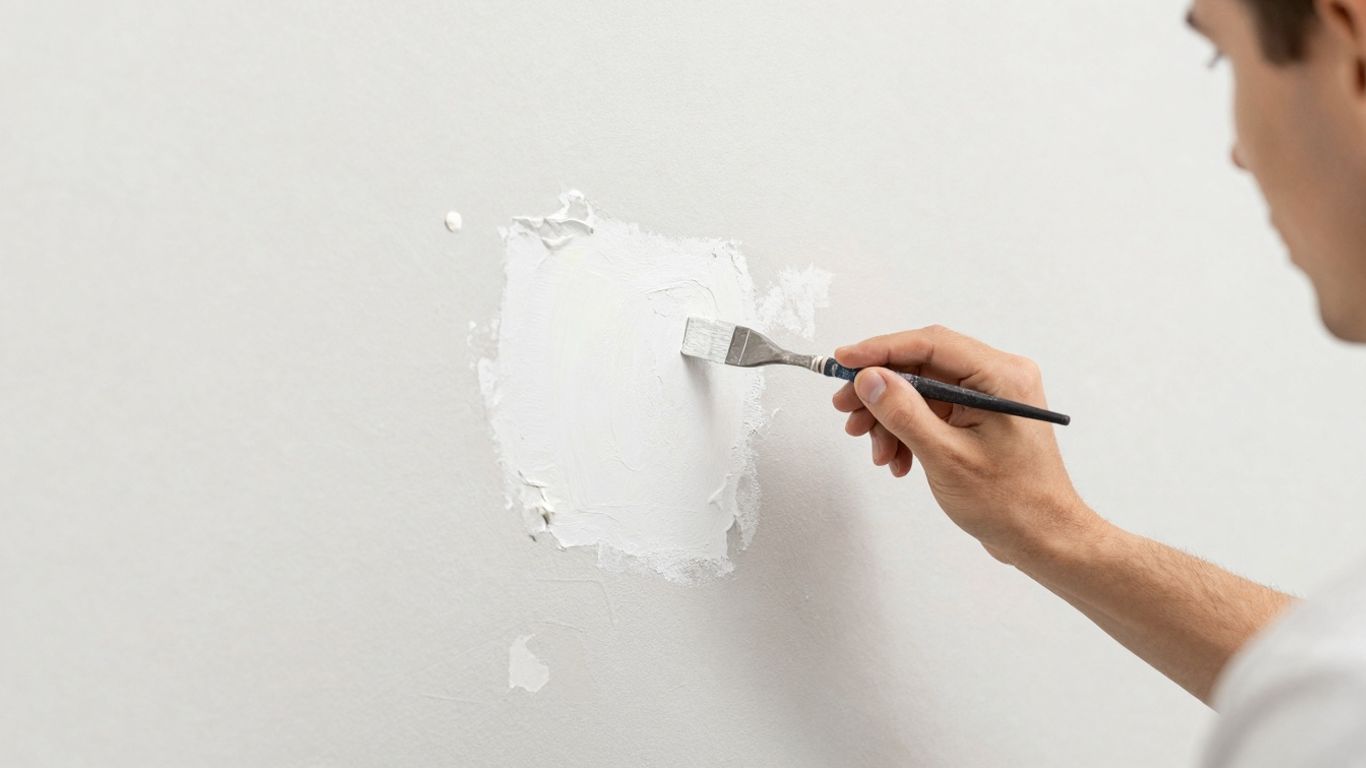
Repairing Cracks, Dents, And Bubbling
Once they know what they're dealing with, the repair work begins. Small dents from furniture or door handles get filled. Cracks, especially those near corners or windows, are carefully opened up a bit, re-taped if needed, and then filled with joint compound. Bubbles, often a sign of moisture or loose paper, are scraped away, the area is dried out if necessary, and then patched. The goal here is to make the wall surface as flat and uniform as possible. This might involve several layers of compound, with drying and light sanding in between each layer to build up a smooth, seamless repair.
Achieving Texture Consistency For A Smooth Foundation
This is where a lot of DIY jobs fall short. Professionals understand that different patches and repairs can create different textures on the wall. After the joint compound is dry, they sand it down. But it's not just about making it smooth; it's about making it match the rest of the wall's texture. They use different grits of sandpaper and techniques to blend the repaired areas perfectly. Sometimes, they might even use a light mist of water and a sponge to help reveal subtle texture differences. A wall that feels consistently smooth to the touch will look much better once painted, with light reflecting evenly across the surface instead of highlighting patchy spots.
Mastering The Art Of Surface Preparation
Getting the walls ready for paint is more than just slapping on a coat. It's about making sure that paint sticks and stays put, looking good for years. Professionals know that a smooth, clean surface is the real secret to a great paint job, not just the color you pick.
Ensuring Proper Paint Adhesion Quality
Think of adhesion as the handshake between the paint and the wall. If that handshake is weak, the paint won't last. Pros start by giving walls a good cleaning. This isn't just a quick wipe-down; it's about removing every bit of grease, dirt, or grime that could get in the way. Sometimes, a special cleaner like trisodium phosphate (TSP) is used, especially if there are stubborn stains. The goal is a surface that's not just clean, but also ready to grab onto that new paint.
- Test the surface: Before anything else, pros check if the wall is ready. Is it dry? Is it smooth? Any dust or moisture is a problem.
- Clean thoroughly: Use the right cleaners for the job. For general dirt, a mild soap and water might do. For tougher stuff, stronger solutions are needed.
- Wipe down: After cleaning, a final wipe with a damp cloth removes any leftover residue, leaving a perfect canvas.
A strong bond means the paint won't crack or peel later. It's the foundation for a lasting finish.
Using Primers For Smooth, Even Application
Primer is like the understudy for your paint color. It seals the wall, covers up old colors or stains, and gives the topcoat something solid to stick to. Without primer, you might end up with uneven color, or worse, the new paint might soak into the wall in weird ways. Professionals often use a specific type of primer depending on the wall's condition. For really dark colors, a tinted primer can save you from needing a dozen coats of your new paint. Applying it evenly with a roller or brush is key – thin, consistent coats are better than one thick, gloppy one.
Checking Coating Durability And Resistance To Peeling
Once the primer is dry and the first coat of paint goes on, the work isn't quite done. Pros take a moment to check how everything is holding up. They look for any spots that seem weak or rough. This quick inspection helps catch problems early. A durable coating means the paint can handle everyday life – bumps, scuffs, and cleaning – without giving up. It's all about making sure the paint job looks fresh and strong, resisting those annoying signs of wear and tear like peeling or fading.
| Surface Condition | Adhesion Check | Durability Concern |
|---|---|---|
| New Drywall | Good | Low |
| Repaired Area | Fair (depends on repair quality) | Medium |
| Previously Painted (clean) | Good | Medium |
| Previously Painted (dirty/greasy) | Poor | High |
| Water-Stained Area | Poor | Very High |
Professional Strategies For Peeling Paint
Peeling paint isn't just an eyesore; it's often a sign of underlying issues that need attention before you even think about a fresh coat. Ignoring it can lead to bigger problems down the line. Professionals know that tackling peeling paint starts with understanding why it's happening in the first place.
Identifying The Causes Of Peeling Paint
Several factors can cause paint to lose its grip on the wall. Moisture is a big one. If water gets behind the paint, it can break the bond between the paint layers and the surface. This often happens due to leaks, high humidity, or even condensation. Another common culprit is poor surface preparation. If the wall wasn't cleaned properly, or if the wrong primer was used, the paint might not adhere well from the start. Sometimes, it's simply a matter of age – old paint layers can become brittle and start to lift.
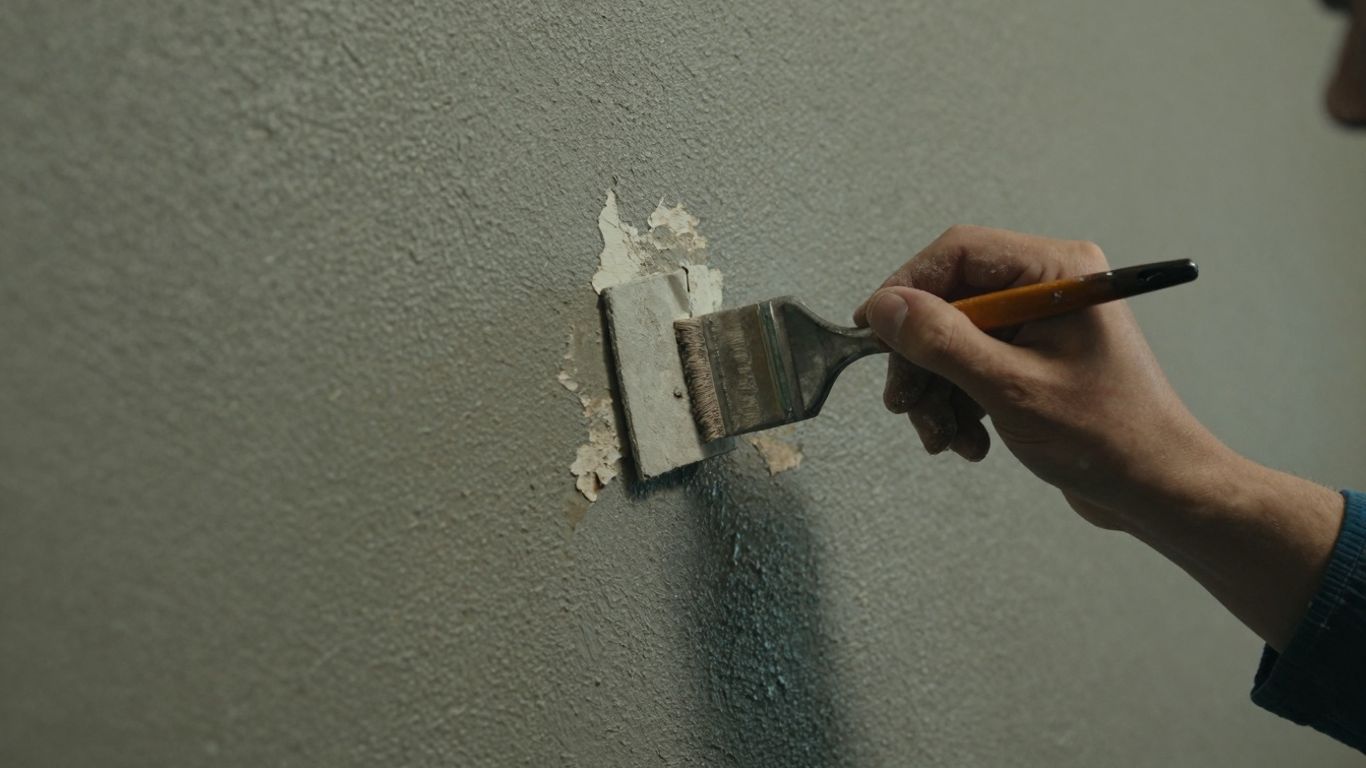
Scraping And Sanding Away Loose Paint
Once you've figured out why the paint is peeling, the next step is to get rid of the loose stuff. This is where patience comes in. You'll need to carefully scrape away all the paint that's flaking or bubbling. Using a putty knife or a scraper works well for this. After you've removed the loose paint, you'll need to sand the area. This smooths out the edges where the paint was removed, making the transition less noticeable. It also helps to create a better surface for the new paint to stick to. Don't rush this part; a thorough job here prevents future peeling in the same spot.
Applying Sealants To Prevent Future Issues
After scraping and sanding, the wall is prepped for the next layer. This is where professionals often use a sealant or a high-quality primer. Primers are key because they help the new paint adhere properly to the wall and cover up any remaining imperfections. For areas that had peeling due to moisture, using a stain-blocking primer is a good idea. This seals the surface and provides a uniform base for your topcoat. Choosing the right primer for the job is important, and sometimes, a specific type is needed depending on the cause of the peeling. Hiring a professional painter is the most effective method for addressing peeling paint. Experts can safely remove loose paint layers, repair underlying surfaces, and apply high-quality primers to ensure a durable finish. This is a good idea.
A common mistake is just slapping a new coat of paint over peeling areas. This might look okay for a little while, but the underlying problem isn't fixed. The new paint will eventually start to peel too, and you'll be back to square one, only with more layers of paint to deal with.
The Professional Painter's Toolkit
You know, sometimes I look at a freshly painted room and just marvel at how smooth and perfect it looks. It's easy to think anyone could do that with a can of paint and a roller, but honestly, there's a whole lot more to it. Professional painters don't just grab whatever's on sale at the hardware store; they have a specific set of tools and materials that make all the difference. It's like any trade, really – the right gear makes the job easier and the results way better.
Essential High-Quality Brushes and Rollers
Let's talk brushes first. A good brush isn't cheap, maybe $15 to $25, but it's worth every penny. For most jobs, especially with water-based paints that pros use a lot, synthetic bristles are the way to go. Look for brushes with tapered bristles and flagged tips – they just lay down paint more smoothly and give you better control. For getting those clean lines around trim and edges, a 2 to 2.5-inch angled brush is a lifesaver. When it comes to rollers, most pros stick with a standard 9-inch roller for covering big walls and ceilings quickly. The nap, or the fuzziness of the roller cover, matters too. A medium nap, like 3/8 inch, is a good all-around choice, but microfiber covers are pretty great for almost any paint type, giving you a really smooth finish.
Choosing Professional-Grade Paints and Primers
This is where you really see the difference. Cheap paint might seem like a good idea to save money, but it often means more coats, less durability, and a finish that just doesn't look as good. Professionals invest in paints that cover well and last. For most interior walls, an eggshell finish strikes a nice balance – it's got a little sheen, which makes it easier to clean, but it doesn't highlight every little imperfection like a glossier paint would. And don't forget primers! They're not just for covering up dark colors, though tinted primers are handy for that. A good primer seals the surface, blocks stains, and gives your topcoat something solid to stick to. This is super important for preventing peeling down the road.
Specialized Equipment for Efficient Work
Beyond the basics, pros use a few other things that speed things up and make the job cleaner. Instead of those flimsy roller trays, many painters use a roller grid that fits inside a 5-gallon bucket. It holds more paint, reduces splatters, and means fewer trips to refill. Painter's poles are another game-changer, letting you reach high ceilings or far walls without constantly climbing up and down a ladder. And for those tiny gaps around trim or windows, a good caulk gun that doesn't drip makes a huge difference in getting a neat, clean edge before you even pick up a brush.
The tools a painter uses aren't just about making the job easier; they're about achieving a level of finish that's hard to replicate with less. It's the combination of quality materials and smart equipment that separates a good paint job from a great one.
Here's a quick look at some common roller cover naps:
| Surface Type | Recommended Nap Length | Best For |
|---|---|---|
| Smooth Walls | 1/4" - 3/8" | Minimal texture, clean finish |
| Semi-Smooth Walls | 3/8" - 1/2" | Slight texture, common wall surfaces |
| Textured Surfaces | 1/2" - 3/4" | Stucco, popcorn ceilings, rough plaster |
| Rough Surfaces | 3/4" - 1"+ | Brick, concrete, heavily textured surfaces |
Ensuring A Flawless Finish
The Importance Of Proper Room Preparation
Before any paint even touches the wall, the room itself needs attention. This means protecting everything that won't be painted. Think floors, furniture, fixtures, and even light switches. Professionals use drop cloths, painter's tape, and plastic sheeting to cover these items. It's not just about preventing drips; it's about creating a clean workspace that allows for focus on the walls. A well-prepped room means less cleanup later and a more professional final look. It shows respect for the client's space and the project itself.
Techniques For Clean Edges And Even Coverage
Getting those sharp lines where walls meet ceilings or trim is an art. Painter's tape is your best friend here, but it needs to be applied carefully and pressed down firmly to prevent paint bleed. For larger areas, using the right roller cover is key. A thicker nap roller works well for textured walls, while a smoother nap is better for flat surfaces. Applying paint in a "W" or "V" pattern helps distribute the paint evenly, and then back-rolling over that section ensures consistent coverage without leaving roller marks. The goal is to build up thin, even coats rather than one thick, sloppy one.
Maintaining Walls After Painting
Keeping your newly painted walls looking great is simpler than you might think. It mostly comes down to gentle care and quick action when issues arise.
- Avoid moisture: High humidity or direct water contact can cause paint to bubble or peel. Ensure good ventilation, especially in bathrooms and kitchens.
- Gentle cleaning: For everyday smudges, use a soft cloth dampened with mild soap and water. Avoid abrasive cleaners or scrub brushes, which can damage the paint finish.
- Protect from impact: Be mindful when moving furniture or other items around. Small pads on the bottom of chairs or tables can prevent scuffs and dents.
A wall that looks perfect right after painting is only half the battle. True quality shows in how well it holds up over time. This means paying attention to the small details during preparation and using the right methods for application. It's about creating a surface that not only looks good but also lasts, resisting wear and tear from daily life.
When To Trust Professional Expertise
The Difference Between DIY And Professional Repair Precision
Look, sometimes you just want to tackle a project yourself. Maybe it's a small patch job, or you're feeling confident after watching a few videos. And for minor fixes, that's totally fine. But when it comes to walls that have seen better days – think cracks, dents, or that weird bubbling under the paint – the difference between a DIY attempt and a pro's touch can be pretty stark. A DIYer might sand a bit too much, or not quite enough, leaving you with seams that show or patches that just don't blend in once the paint dries. Professionals, on the other hand, have a trained eye for these things. They know how to feather joint compound just right, how to tape seams so they disappear, and they use tools that help them get a perfectly smooth, even surface. It’s about precision that you can actually see and feel.
How Experience Prevents Rework Or Visible Patch Lines
Experience really does count for a lot in this game. A seasoned painter has seen pretty much every wall problem out there. They know what to look for before they even pick up a tool – like hidden moisture or structural issues that a beginner might miss. This upfront inspection is key. It means they're not just slapping on some spackle; they're addressing the root cause. Because of this, they can avoid those frustrating situations where you paint over a repair, only to see a faint outline or a different texture show up later. They understand how different materials react and how paint settles. This knowledge means they get it right the first time, saving you the headache and cost of having to redo the work.
Partnering With Restoration Experts For Complex Issues
Sometimes, a wall problem goes beyond just a dent or a crack. We're talking about significant water damage, maybe mold, or extensive peeling paint that suggests a deeper issue. In these cases, it's not just about painting anymore; it's about restoration. Trying to paint over serious water damage, for instance, is like putting a band-aid on a broken bone. The moisture will keep causing problems, and the paint will fail. That's where bringing in specialists comes in. These are the folks who know how to properly dry out walls, remediate mold, and fix structural damage. They work hand-in-hand with painters, making sure the wall is completely sound and ready before any paint is applied. It’s a team effort to get your home back to its best.
When you're faced with wall issues that seem more than just cosmetic, it's wise to consider who has the right skills for the job. Sometimes, the most cost-effective and time-saving approach is to bring in someone who does this kind of work every day. They have the tools, the knowledge, and the experience to handle tricky situations without creating more problems down the line.
Sometimes, figuring out the best way to handle a project can be tricky. When you're unsure about the right steps or need expert advice, it's smart to lean on those who know the most. Professional expertise is there to guide you through complex tasks, ensuring a job well done. Don't hesitate to seek out the pros when you need them most. Visit our website today to learn more about how we can help!
Wrapping It Up
So, tackling those tricky wall issues, like peeling paint or water damage, might seem like a big job. But as we've seen, with the right approach and a bit of know-how, it's totally doable. Professionals have their tricks, sure, but understanding the basics of good prep work and knowing when to call in the experts can save you a lot of headaches. Remember, a solid foundation is key, whether you're dealing with a small patch or a larger repair. Taking the time to do it right the first time means your walls will look great and last much longer. Don't be afraid to ask for help if things get complicated; sometimes, that's the smartest move.
Frequently Asked Questions
What's the biggest problem with water damage before painting?
Water damage is tricky because it can hide behind walls and under floors. If you paint over it without fixing it, it can cause paint to bubble, peel, or even lead to mold. It's like putting a band-aid on a serious cut – it looks better for a moment, but the real problem is still there and can get worse.
How can I tell if my walls have water damage?
Look for signs like paint that's peeling or looks discolored, walls that seem soft or spongy, or if you see cracks or bubbles in the drywall. Sometimes, you might even smell a musty odor, which often means mold is starting to grow because of moisture.
Why is it important to fix water damage right away?
The longer water damage sits, the more it can spread and damage the structure of your home. Fixing it quickly stops mold from growing and prevents more costly repairs down the road. It's much cheaper to fix a small leak than to repair a whole wall or ceiling that's been ruined.
What makes paint peel off walls?
Paint usually peels when it can't stick to the surface properly. This can happen if the wall wasn't cleaned well before painting, if there's moisture trapped behind the paint (like from water damage), or if the paint itself is old and breaking down. Sometimes, using the wrong type of paint or primer can also be the cause.
What tools do professional painters use that I might not?
Pros use high-quality brushes and rollers that help them apply paint smoothly and evenly. They also often use special tools like painter's poles to reach high spots easily, and sometimes even equipment for spraying paint for a very smooth finish. Good tools make a big difference in the final look.
When should I hire a professional painter instead of doing it myself?
If you have major issues like widespread peeling paint, water damage, or large cracks, it's best to call a pro. They have the experience and tools to fix these problems correctly the first time. Trying to fix them yourself might end up costing more if you have to redo the work because it didn't turn out right.


Comments
Post a Comment