How Professionals Safely Strip Old Paint Without Damaging Surfaces: A Comprehensive Guide

Getting rid of old, chipped paint can feel like a big job, right? Whether you're fixing up an old piece of furniture or prepping a wall for a new look, you want to get that old paint off without messing up what's underneath. It might seem tricky, but with the right approach, you can make that old paint disappear and get a nice, clean surface ready for whatever comes next. This guide is all about helping you figure out how professionals safely strip old paint without damaging surfaces.
Key Takeaways
- Always check the type of paint and the condition of the surface before you start stripping.
- Choose the right stripping method – chemical, heat, steam, or infrared – based on the paint and surface.
- Apply strippers gently and use soft scraping tools to avoid scratching or gouging the material.
- Take extra care with delicate surfaces like antique wood or detailed trim, using gentler methods.
- Prioritize safety by ensuring good ventilation, wearing protective gear, and handling lead paint with extreme caution.
Understanding Paint Types And Surface Conditions

Before you even think about grabbing a scraper or a chemical stripper, let's talk about what you're actually dealing with. It's like going into a battle without knowing your enemy, right? You need to know what kind of paint is on that surface and what the surface itself is like underneath. Doing this upfront saves you a ton of headaches later on, and honestly, it's the difference between a job well done and a complete mess.
Evaluating The Paint Type For Removal
So, what's coating your surface? Is it that old, maybe chalky, oil-based paint that's been on there for ages, or is it a newer, more flexible latex or water-based paint? This matters. Oil-based paints are usually tougher to remove and might need stronger chemicals or more heat. Latex paints, on the other hand, tend to soften up more easily with heat or milder strippers. You can often do a quick test: rub a bit of rubbing alcohol or nail polish remover on a small, hidden spot. If the paint softens or comes off on your cloth, it's likely water-based. If it doesn't budge, you're probably dealing with oil-based. Another trick is to lightly sand a tiny area. If you get a powdery residue, it's probably water-based. If it peels or chips, it's more likely oil-based.
Assessing The Condition Of The Underlying Surface
Now, what's hiding under all those layers? Is it sturdy wood that can take a bit of scraping, or is it a delicate piece with intricate carvings that needs a feather-light touch? Maybe it's metal, concrete, or drywall. Each material reacts differently. Old wood might be soft, brittle, or even have rot in places. Metal can rust if exposed to moisture for too long. You need to be gentle with detailed areas, using smaller tools and less aggressive methods. For flat, solid surfaces, you might have a bit more leeway, but you still don't want to gouge or scratch it unnecessarily. Damage to the underlying surface is a common concern, so always proceed with caution.
Performing A Test Patch For Method Suitability
Seriously, don't skip this step. Find a small, inconspicuous spot – maybe a corner, the back of a piece of furniture, or a less visible section of trim. Try out the stripping method you're planning to use on this little patch. See how the paint reacts. Does the stripper work? Does the heat gun soften it without scorching the surface? How easily does the paint lift? This test run is your chance to figure out if your chosen method is effective and safe for the specific paint and surface you're working with. It's way better to discover a problem on a tiny spot than to realize you've ruined the whole thing after hours of work.
Selecting The Appropriate Paint Stripping Method
Choosing the right way to get rid of old paint is a big deal. It's not a one-size-fits-all situation, and picking the wrong method can lead to a lot of frustration, or worse, damage to whatever you're working on. You've got a few main options, and each has its own strengths and weaknesses. It really comes down to the type of paint, the surface underneath, and how much paint you need to remove.
Chemical Strippers For Effective Paint Breakdown
Chemical strippers are like the heavy hitters of paint removal. They work by breaking down the chemical bonds in the paint, making it soft and gooey so you can scrape it off. They're pretty good for multiple layers of paint, especially tougher ones like oil-based or enamel paints. You just brush it on, let it sit for a bit – sometimes a few minutes, sometimes a few hours, depending on the product and how many layers you're dealing with – and then you scrape away the mess.
- Pros: Good for thick paint layers, works on various paint types.
- Cons: Can have strong fumes, requires careful handling and good ventilation, needs neutralization afterward.
- Best for: Stubborn, multiple layers of paint on durable surfaces.
When using chemical strippers, always read the label carefully. What works for one type of paint or surface might not be the best for another. And seriously, wear those gloves and eye protection; nobody wants that stuff on their skin or in their eyes.
Heat Guns For Softening Stubborn Paint Layers
Heat guns use hot air to soften paint, making it bubble up and easier to scrape away. This method is often preferred because it doesn't involve harsh chemicals. You wave the heat gun over the paint, keeping it moving to avoid scorching the surface, and as the paint softens, you scrape it off. It's a bit more hands-on than chemical strippers, and you have to be careful not to overheat the surface, especially if it's wood or something delicate.
- Pros: No chemicals, can be effective on many surfaces.
- Cons: Risk of scorching or fire, slower for very thick paint layers, fumes can still be an issue (especially with lead paint).
- Best for: Single or multiple layers of paint on wood, metal, or plaster where chemicals aren't ideal.
Steam Strippers For Gentle Paint Removal
Steam strippers use the power of steam to loosen paint. They're a gentler option, which is great if you're worried about damaging the underlying material. You hold the steam plate against the paint, and the steam penetrates and softens it. Then, you scrape it off. It's a slower process than chemical strippers or heat guns, but it's a good choice for delicate surfaces or when you want to avoid chemicals altogether.
- Pros: Gentle, no chemicals, good for delicate surfaces.
- Cons: Slow, can introduce moisture to the surface, less effective on very thick or tough paint.
- Best for: Delicate wood, plaster, or areas where chemical strippers are not suitable.
Infrared Devices For Safe Heat Application
Infrared paint removers are a newer option that uses infrared heat to soften paint. They're often considered safer than traditional heat guns because they heat the paint directly rather than the surrounding air, which can reduce the risk of scorching and the release of harmful fumes. You hold the device close to the paint, and the infrared energy heats and loosens it for scraping. This method is gaining popularity for its balance of effectiveness and safety.
- Pros: Safer than heat guns, less fume release, efficient heating.
- Cons: Can be more expensive, might require specific techniques.
- Best for: A wide range of surfaces, especially when minimizing fume exposure and surface damage is a priority.
Mastering Safe Paint Removal Techniques
Okay, so you've picked your method, and you're ready to get down to business. This is where the real work happens, and honestly, it's all about being patient and gentle. Rushing this part is a surefire way to end up with a scratched-up surface or paint that's only half gone. Nobody wants that.
Gentle Application of Stripping Agents
Whether you're slathering on a chemical stripper or using a heat gun, the key is to be deliberate. With chemical strippers, use a brush or roller to apply an even coat. Don't just glob it on in one spot. You want it to spread out and start working its magic evenly. Let it sit for the time the product instructions say – seriously, read them. It might seem like forever, but this is when the stripper breaks down the paint's bond.
- Apply strippers in a consistent, even layer.
- Allow the stripper to dwell for the recommended time.
- Avoid applying excessive amounts, which can be wasteful and harder to clean up.
If you're using a heat gun, keep it moving. Don't just blast one spot until it smokes. Move it back and forth a few inches above the surface. You'll see the paint start to soften and bubble up. That's your cue that it's ready to be scraped.
Patience is your best friend here. Let the tools and products do the heavy lifting. Forcing things rarely ends well.
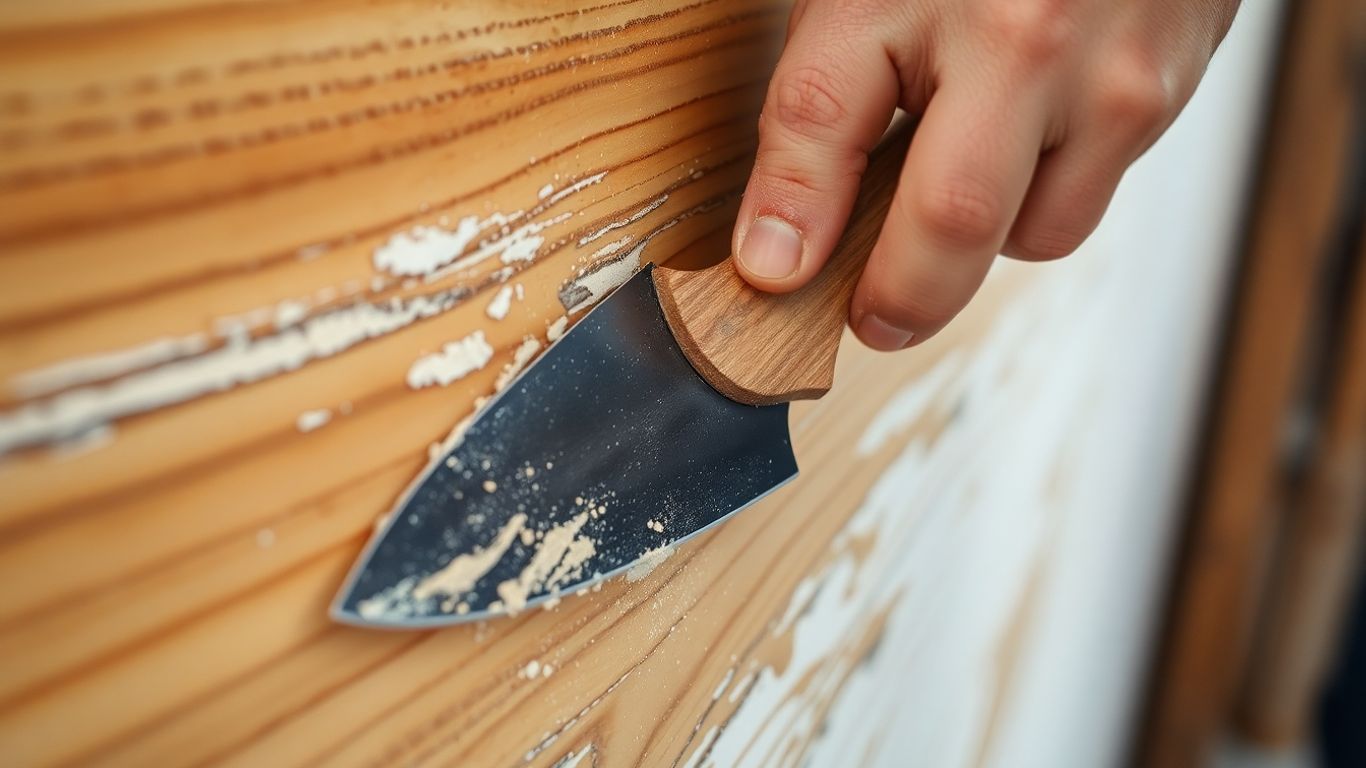
Soft Scraping to Lift Loosened Paint
Once the paint is softened, it's time to scrape. This is where you need to be careful. Forget about using brute force. You want to use a tool that's appropriate for the job and the surface. For most jobs, a plastic scraper is a good bet because it's less likely to gouge the material underneath. If you're working on wood, a metal scraper can work, but you need to be extra gentle and keep the angle low.
- Use a plastic scraper for most surfaces to minimize damage.
- For tougher jobs, a metal scraper can be used, but with extreme caution.
- Always scrape in the direction of the paint's natural grain if applicable.
If the paint is really stubborn, you might need to reapply some stripper or a bit more heat. Don't try to chip away at it. It should lift off relatively easily if the stripper has done its job. If it's still stuck fast, it probably needs more time to soak.
Using Appropriate Tools for Intricate Areas
What about those fiddly bits? Corners, edges, carved details – they can be a pain. For these spots, you'll want to switch to smaller tools. Old toothbrushes are surprisingly effective for getting into tight corners. Cotton swabs soaked in stripper can work wonders on detailed trim. Even a small putty knife with its corners rounded off can give you more control than a big scraper. The goal is to get the paint off without damaging the delicate parts of the object or surface you're working on. It takes a bit more time, sure, but the results are worth it when you don't have to fix accidental gouges later.
Surface-Specific Paint Stripping Strategies
Different materials need different approaches when you're trying to get old paint off. What works for sturdy metal might totally wreck delicate plaster. It's all about picking the right method for the job to avoid damage and make your life easier.
Stripping Paint From Wood Surfaces With Care
Wood is tricky. You want to get the paint off without gouging the grain or scorching the surface. Chemical strippers are often a good bet here, but you've got to be patient. Apply a thick layer and let it do its thing – you'll see the paint start to bubble. Then, use a plastic scraper, or a metal one with the edges dulled down, to gently lift the softened paint. Always work with the wood grain. For really old or delicate wood, a heat gun on a low setting can help, but keep it moving! You don't want to burn the wood. After you've scraped off the bulk of the paint, you might need to do some light sanding to get rid of any stubborn bits.
- Test first: Always try your stripper on a hidden spot to make sure it won't damage the wood.
- Gentle scraping: Use plastic scrapers or putty knives with softened edges.
- Follow the grain: Scrape in the direction of the wood grain to avoid gouges.
- Neutralize: If you use a chemical stripper, make sure to neutralize any residue as per the product instructions.
Removing Paint From Metal Components
Metal is usually tougher than wood, which is good news. You can often be a bit more aggressive. For most metal items, a good chemical stripper will break down the paint effectively. After it's softened, you can usually scrape it off with a metal scraper. If you're dealing with rust underneath, that's a whole other battle, but for just paint removal, metal is pretty forgiving. Power washing can sometimes work on larger metal structures, but be careful with delicate parts. For really tough, multi-layered paint jobs on metal, sandblasting is an option, but that's usually a job for the pros.
Addressing Paint on Concrete Structures
Concrete can take a beating, so you have more options. For exterior concrete, like a patio or foundation, a pressure washer can be quite effective at blasting away loose or peeling paint. Just be mindful of the pressure setting; you don't want to etch the concrete itself. Chemical strippers also work well on concrete. You can apply them, let them sit, and then scrub or scrape the paint off. For very stubborn paint, or large areas, professional sandblasting is also an option for concrete, but it's a messy job. Make sure to sweep and rinse the area thoroughly afterward to remove all debris.
Paint Removal for Walls and Trim
Walls and trim are where you need to be extra careful about the surface underneath. For drywall or plaster walls, harsh chemicals or aggressive scraping can cause damage. Chemical strippers designed for interior use, or even just warm, soapy water for latex paint, are usually the way to go. Apply gently, let it soften, and then use a plastic scraper or a soft cloth. For trim, especially if it has intricate details, you might need cotton swabs or a soft toothbrush dipped in stripper to get into the nooks and crannies. The goal is to lift the paint, not to dig into the surface.
- Drywall/Plaster: Use gentler methods; avoid excessive moisture.
- Wood Trim: Be mindful of the wood grain and avoid gouging.
- Intricate Areas: Use small tools like cotton swabs or old toothbrushes.
- Ventilation: Always ensure good airflow when using chemical strippers indoors.
Essential Safety Precautions During Paint Removal
Alright, before we even think about scraping or dissolving old paint, let's talk about staying safe. Seriously, this part is non-negotiable. Taking a few minutes to get your safety setup right can save you a lot of trouble, like skin irritation, breathing problems, or even worse.
Ventilation and Personal Protective Equipment
First things first: air. You absolutely need good airflow. Open up windows and doors. If you're working inside, consider using fans to push the fumes out. This is especially important when you're using chemical strippers, as those fumes can be pretty nasty. Don't just rely on a little crack in the window; make sure the air is really moving.
And then there's your gear. You'll want to wear:
- Gloves: Thick, chemical-resistant gloves are a must. Your hands will thank you.
- Eye Protection: Safety glasses or goggles. Paint chips and stripper splashes happen.
- Respiratory Protection: A mask or respirator. If you're dealing with dust or strong chemical fumes, get something rated for it. A simple dust mask won't cut it for chemical vapors.
Think of your safety gear as your personal shield against the hazards of paint removal. It's not optional; it's a requirement for a healthy outcome.
Handling Lead-Based Paint Safely
Now, this is a big one, especially if you're working on older homes or furniture, anything built before 1978. That old paint might contain lead. If you disturb it, you can release lead dust, which is really harmful, especially for kids. You can get lead test kits at most hardware stores. If you find lead paint:
- Don't dry scrape or sand it. This creates a lot of dust.
- Wet the area before scraping to keep dust down.
- Use a HEPA vacuum for cleanup.
- Seal off the work area completely to prevent lead dust from spreading.
- Dispose of waste properly. Lead-contaminated materials are hazardous waste.
If you're unsure or dealing with a large area of suspected lead paint, it's often best to call in professionals who are trained and equipped for lead abatement. It's better to be safe than sorry when lead is involved.
Preventing Fire Hazards With Heat Tools
If you're using a heat gun, you're essentially using a controlled flame, so fire is a real risk. Always have a fire extinguisher handy – and know how to use it. Keep the heat gun moving; don't hold it in one spot for too long, as you can scorch surfaces or even ignite nearby materials like insulation or old paint drips.
- Clear the area of flammable materials like rags, solvents, or loose debris.
- Watch for hidden hazards like electrical wiring or gas lines behind walls.
- Never leave a hot heat gun unattended.
- Allow the tool to cool down completely before storing it.
Using heat tools requires constant attention. It's easy to get distracted, but one moment of inattention can lead to a serious fire. Stay focused and keep that extinguisher close.
Post-Stripping Surface Preparation And Cleanup
Neutralizing Chemical Residues
So, you've managed to get all that old paint off. Nice work! But hold on, if you used any chemical strippers, there's a good chance some residue is still hanging around. This stuff can mess with your new paint job, making it bubble or peel later on. Most chemical strippers will tell you on the can if you need to neutralize them. Usually, it's a simple wipe-down with a specific solution they recommend, or sometimes just a good wash with water and a bit of soap. It’s really important to follow those instructions to the letter. You don't want any of that stripper left behind.
Cleaning and Preparing Surfaces For Refinishing
After you've dealt with any chemical leftovers, it's time for a proper clean. Think of it like prepping a canvas before you paint. You want a smooth, clean surface for whatever you're planning to do next, whether that's painting, staining, or varnishing. For most surfaces, a good wipe-down with a damp cloth is a good start. If you dealt with greasy residue, you might need a bit of mild detergent or even mineral spirits, especially if you used oil-based products. Just make sure to rinse thoroughly afterward so you don't leave any cleaning product behind either. For wood, letting it dry completely is key. You might also want to give it a light sanding with some fine-grit sandpaper to smooth out any rough spots or leftover paint bits that you missed. This step really makes a difference in how the final finish looks.
Proper Disposal Of Paint Debris
Now, about all that gunk you scraped off – the old paint, the stripper-soaked rags, the goop. You can't just toss it all in the regular trash, especially if you used chemical strippers. Those chemicals can be pretty nasty for the environment. Check with your local waste disposal service or your town's website. They'll have specific rules about how to get rid of paint waste, especially if it contains lead or hazardous chemicals. Sometimes, you need to let paint-soaked rags dry out completely in a safe, well-ventilated area before you can dispose of them, or take them to a special hazardous waste drop-off. It might seem like a hassle, but doing it right keeps everyone safer and the planet happier.
Taking a few extra minutes to properly clean and dispose of materials after stripping paint can save you a lot of headaches down the road. It ensures your new finish adheres well and prevents environmental contamination.
After you've stripped away old paint, it's super important to get the surface ready for the new coat. This means cleaning up any dust or leftover bits. A clean surface helps the new paint stick better and look smoother. Want to know more about making your surfaces look great? Visit our website for tips and services!
Wrapping Up Your Paint Stripping Project
So, you've made it through the paint stripping process. It might have seemed like a lot at first, but by taking your time and using the right methods, you've managed to get that old paint off without wrecking the surface underneath. Remember, prepping properly and choosing the right tools for the job, whether it's a gentle scraper or a specific chemical stripper, makes all the difference. And hey, if you ran into any snags, you learned how to handle them. Now you've got a clean slate, ready for whatever you plan to do next. Nice job!
Frequently Asked Questions
What's the first thing I should do before starting to strip paint?
Before you even think about touching the paint, make sure you set up your workspace. Lay down a drop cloth to catch any mess. Also, open up windows for fresh air, especially if you're using chemicals. Then, gather all the tools and supplies you'll need for the job.
How do I pick the best way to remove paint?
The best method depends on the surface and the type of paint. For tough jobs, chemical strippers can break down paint. Heat guns soften it for easier scraping. Sanding works well for smaller areas or for smoothing things out afterward. Always read the instructions for whatever method you choose!
Is it safe to use a heat gun for paint removal?
Heat guns can be effective, but you need to be careful. Start with a low heat setting and keep the gun moving to avoid damaging the surface underneath or causing a fire. If you're dealing with old paint, be aware that it might contain lead, which can be dangerous if inhaled when heated.
What should I do if the paint isn't coming off easily?
If the paint is being stubborn, you might need to reapply your stripper or let it sit a bit longer. Sometimes, a different tool, like a scraper with a sharper edge (but still used gently!), can help. For really tough spots, you might need to try a stronger stripper or a different method altogether.
How do I clean up after stripping paint?
Cleanup is important! Scrape off all the loose paint and debris. If you used a chemical stripper, you might need to wipe the surface down with a special cleaner or mild soap and water to get rid of any leftover residue. Dispose of paint scraps properly according to local rules.
When should I consider calling a professional painter?
If you're working on a very valuable or delicate piece, or if the job seems too big or complicated for you to handle safely, it's always a good idea to call a professional. They have the experience and tools to get the job done right without causing damage.


Comments
Post a Comment